RabbitMQ是一款使用Erlang语言开发的,实现AMQP(高级消息队列协议)的开源消息中间件。
特点:
- 可靠性。支持持久化,传输确认,发布确认等保证了MQ的可靠性。
- 灵活的分发消息策略。这应该是RabbitMQ的一大特点。在消息进入MQ前由Exchange(交换机)进行路由消息。分发消息策略有:简单模式、工作队列模式、发布订阅模式、路由模式、通配符模式。
- 支持集群。多台RabbitMQ服务器可以组成一个集群,形成一个逻辑Broker。
- 多种协议。RabbitMQ支持多种消息队列协议,比如 STOMP、MQTT 等等。
- 支持多种语言客户端。RabbitMQ几乎支持所有常用编程语言,包括 Java、.NET、Ruby 等等。
- 可视化管理界面。RabbitMQ提供了一个易用的用户界面,使得用户可以监控和管理消息 Broker。
- 插件机制。RabbitMQ提供了许多插件,可以通过插件进行扩展,也可以编写自己的插件。
安装(docker)
1,在docker中安装rabbitmq
docker run -d --name rabbitmq -p 5671:5671 -p 5672:5672 -p 4369:4369 -p  25672:25672 -p 15671:15671 -p 15672:15672
rabbitmq:management


4369,25672(Erlang发现&集群端口)
5672,5671(AMQP端口)
15672 (web管理后台端口)
61613,61614(STOMP协议端口)
1883,8883(MQTT协议端口)
官方文档: https://www.rabbitmq.com/networking.html
2,为rabbitmq设置开机自启
docker update rabbitmq --restart=always
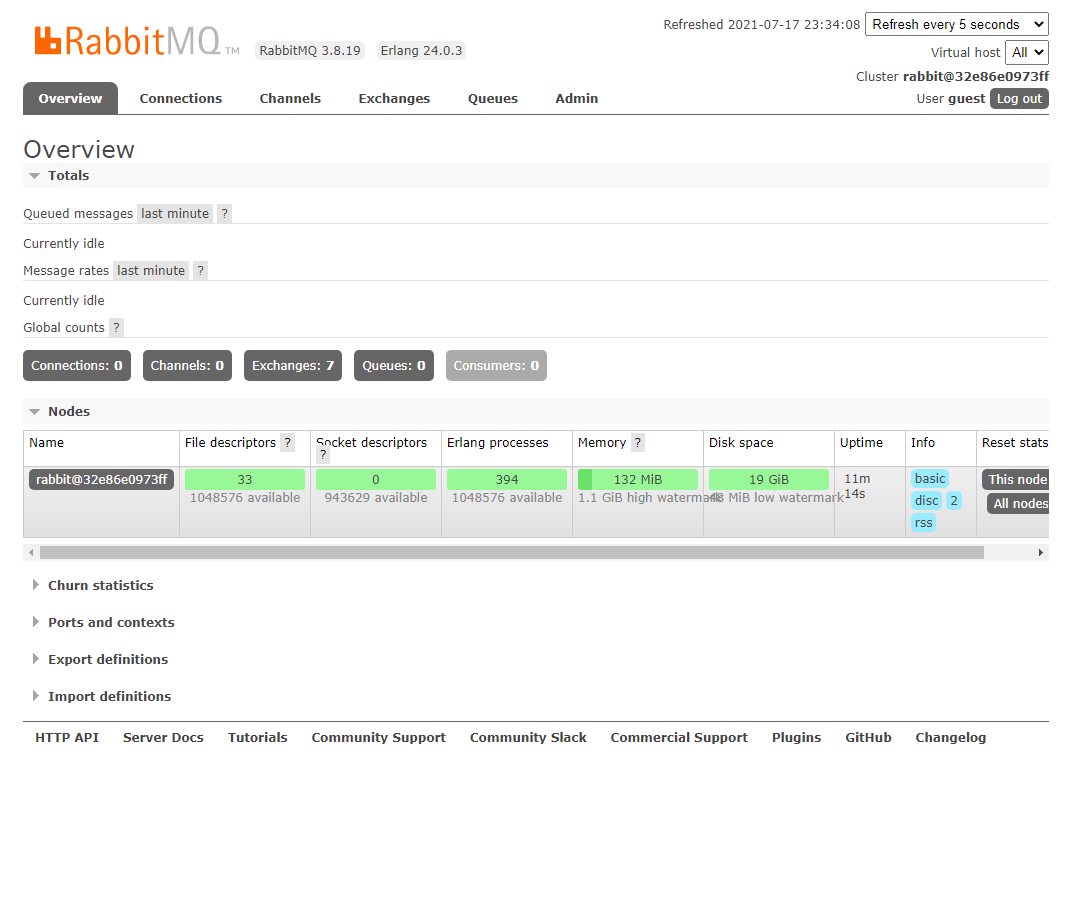
访问可视化界面
访问localhost:15672
默认账号:guest,密码:guest
Exchange四种类型
消息发送到RabbitMQ后首先要经过Exchange路由才能找到对应的Queue,四种类型的Exchange,Direct Exchange,Fanout exchange、Topic exchange、Headers exchange。
1,Direct Exchange
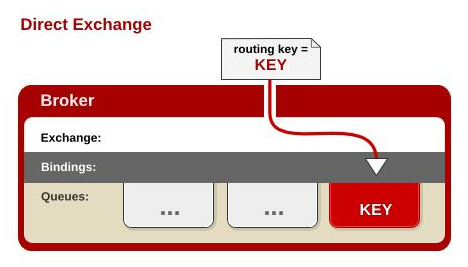
直连交换机意思是此交换机需要绑定一个队列,要求该消息与一个特定的路由键完全匹配。简单点说就是一对一的,点对点的发送。
2,Fanout exchange
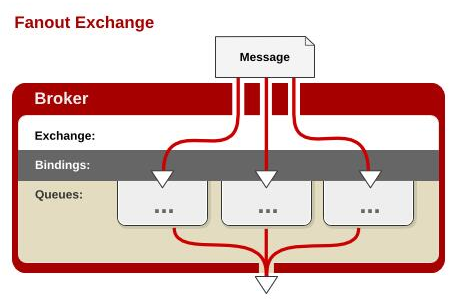
这种类型的交换机需要将队列绑定到交换机上。一个发送到交换机的消息都会被转发到与该交换机绑定的所有队列上。很像子网广播,每台子网内的主机都获得了一份复制的消息。简单点说就是发布订阅。
3,Topic Exchange
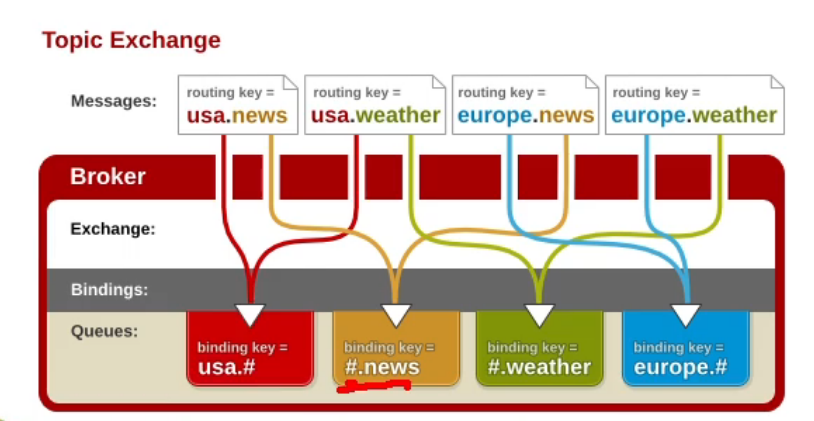
直接翻译的话叫做主题交换机,如果从用法上面翻译可能叫通配符交换机会更加贴切。这种交换机是使用通配符去匹配,路由到对应的队列。通配符有两种:"*" 、 "#"。需要注意的是通配符前面必须要加上"."符号。
-
* 符号:有且只匹配一个词。比如 a.*可以匹配到"a.b"、"a.c",但是匹配不了"a.b.c"。
-
# 符号:匹配一个或多个词。比如"rabbit.#"既可以匹配到"rabbit.a.b"、"rabbit.a",也可以匹配到"rabbit.a.b.c"。
4,Headers Exchange
这种交换机用的相对没这么多。它跟上面三种有点区别,它的路由不是用routingKey进行路由匹配,而是在匹配请求头中所带的键值进行路由


创建队列需要设置绑定的头部信息,有两种模式:全部匹配和部分匹配。如上图所示,交换机会根据生产者发送过来的头部信息携带的键值去匹配队列绑定的键值,路由到对应的队列
springboot整合RabbitMQ
1,引入spring-boot-start-amqp
<dependency>
            <groupId>org.springframework.boot</groupId>
            <artifactId>spring-boot-starter-amqp</artifactId>
</dependency>
2,application.yml配置
配置spring.rabbitmq信息
spring.rabbitmq.host=192.168.56.10
spring.rabbitmq.port=5672
spring.rabbitmq.virtual-host=/
3,添加@EnableRabbit注解,开启rabbitmq
在springboot的启动类上添加@EnableRabbit注解
4,测试RabbitMQ
1,AmqpAdmin:管理组件
@SpringBootTest
class GulimallOrderApplicationTests {

    @Autowired
    AmqpAdmin amqpAdmin;

    @Test
    public void createExchange(){
        /**
         * 创建Exchange
         * DirectExchange(String name, boolean durable, boolean autoDelete, Map<String, Object> arguments)
         * name 交换机的名字
         * durable 是否持久化
         * autoDelete 是否自动删除
         * arguments 交换机的参数
         */
        DirectExchange directExchange = new DirectExchange("hello-java-Exchange",true,false);
        amqpAdmin.declareExchange(directExchange);
        System.out.println("Exchange创建成功");
    }

    @Test
    public void createQueue(){
        /**
         * 创建Queue
         * Queue(String name, boolean durable, boolean exclusive, boolean autoDelete, @Nullable Map<String, Object> arguments)
         * name 队列的名字
         * durable 是否持久化
         * exclusive 是否排他,true,队列是排他的队列,队列只能被声明的连接使用
         * autoDelete 是否自动删除
         * arguments 指定参数
         */
        Queue queue = new Queue("hello-java-queue",true,false,false);
        amqpAdmin.declareQueue(queue);
        System.out.println("Queue创建成功");
    }

    @Test
    public void createBinding(){
        /**
         * 创建Binding
         * Binding(String destination, Binding.DestinationType destinationType, String exchange, String routingKey, @Nullable Map<String, Object> arguments) {
         * destination 目的地
         * destinationType 目的地的类型
         * exchange 交换机
         * routingKey 路由键
         * arguments 自定义参数
         *
         * 将exchange指定的交换及和destination目的地进行绑定,使用routingKey作为指定的路由键
         */
        Binding binding = new Binding("hello-java-queue",
                Binding.DestinationType.QUEUE,
                "hello-java-Exchange",
                "hello.java",
                null);
        amqpAdmin.declareBinding(binding);
        System.out.println("Binding创建成功");
    }
}
2.RabbitTemplate:消息发送处理组件
    @Autowired
    RabbitTemplate rabbitTemplate;

    @Test
    public void sendMessageTest(){
        //1,发送消息
        String msg = "Hello World";
        //rabbitTemplate.convertAndSend("hello-java-Exchange","hello.java",msg);

        //2,发送对象,如果发送的消息是个对象,我们会使用序列化机制,将对象写出去,对象必须实现serializable
        OrderReturnReasonEntity reasonEntity = new OrderReturnReasonEntity();
        reasonEntity.setId(1L);
        reasonEntity.setCreateTime(new Date());
        reasonEntity.setName("hhhh");
        rabbitTemplate.convertAndSend("hello-java-Exchange","hello.java",reasonEntity);

        System.out.println("消息发送完成,"+reasonEntity);
    }
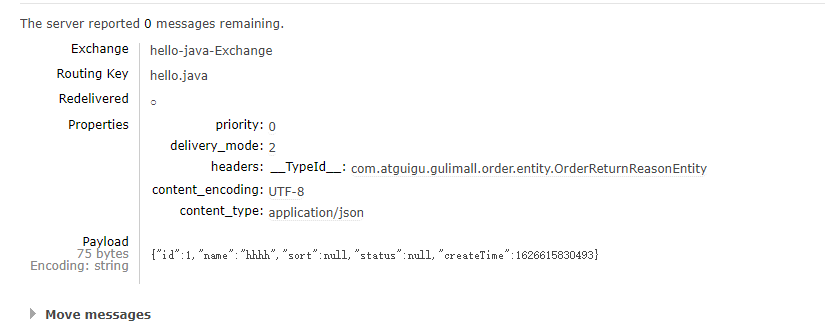
发送对象,序列化结果为:

如果想要发送的对象类型是一个json,可以配置一个消息转换器:
@Configuration
public class MyRabbitConfig {

    @Bean
    public MessageConverter messageConverter(){
        return new Jackson2JsonMessageConverter();
    }
}
3.监听消息
1,@RabbitListener(标注类+方法上)
监听消息:使用RabbitListener;必须有@EnableRabbit
    /**
     * queues: 声明需要监听的所有队列
     */
    @RabbitListener(queues = {"hello-java-queue"})
    public void receveMessage(Object message){
        System.out.println("接收到消息内容;"+message+"==》类型:"+message.getClass());
    }
结果为:
接收到消息内容;(Body:'{"id":1,"name":"hhhh","sort":null,"status":null,"createTime":1626621772053}' MessageProperties [headers={__TypeId__=com.atguigu.gulimall.order.entity.OrderReturnReasonEntity}, contentType=application/json, contentEncoding=UTF-8, contentLength=0, receivedDeliveryMode=PERSISTENT, priority=0, redelivered=false, receivedExchange=hello-java-Exchange, receivedRoutingKey=hello.java, deliveryTag=1, consumerTag=amq.ctag-ClkTx13nyQoh7yZr8OBAgQ, consumerQueue=hello-java-queue])==》类型:class org.springframework.amqp.core.Message
/**
     * queues: 声明需要监听的所有队列
     *
     * org.springframework.amqp.core.Message
     * 参数可以写一下类型
     * 1,Message message:原生消息详细信息。头+体
     * 2,T<发送消息的类型> OrderReturnReasonEntity content
     * 3,Channel channel:当前传输数据的通道
     *
     * Queue: 可以很多人都来监听。只要接收消息,队列删除消息,而且只能有一个收到此消息
     */
    @RabbitListener(queues = {"hello-java-queue"})
    public void receveMessage(Message message, OrderReturnReasonEntity content, Channel channel){
        byte[] body = message.getBody();
        //消息头属性信息
        MessageProperties messageProperties = message.getMessageProperties();


        System.out.println("接收到消息内容;"+message+"==》内容:"+content);
    }
结果为:
接收到消息内容;(Body:'{"id":1,"name":"hhhh","sort":null,"status":null,"createTime":1626622794101}' MessageProperties [headers={__TypeId__=com.atguigu.gulimall.order.entity.OrderReturnReasonEntity}, contentType=application/json, contentEncoding=UTF-8, contentLength=0, receivedDeliveryMode=PERSISTENT, priority=0, redelivered=false, receivedExchange=hello-java-Exchange, receivedRoutingKey=hello.java, deliveryTag=1, consumerTag=amq.ctag-UJa6U9hz_PizDIwsIwHXZg, consumerQueue=hello-java-queue])==》内容:OrderReturnReasonEntity(id=1, name=hhhh, sort=null, status=null, createTime=Sun Jul 18 23:39:54 CST 2021)
2,@RabbitHandler(标在方法上)
@RabbitListener(监听队列)+@RabbitHandler重载区分不同的消息
发送消息:
如果用junit发送消息,部分消息可能会被junit控制台接收到
@RestController
public class RabbitController {

    @Autowired
    RabbitTemplate rabbitTemplate;

    @GetMapping("/send")
    public String sendMessage(){
        for(int i=0; i<10; i++){
            OrderReturnReasonEntity reasonEntity = new OrderReturnReasonEntity();
            reasonEntity.setId(1L);
            reasonEntity.setCreateTime(new Date());
            reasonEntity.setName("hhhh-"+i);
            rabbitTemplate.convertAndSend("hello-java-Exchange","hello.java",reasonEntity);

            System.out.println("消息发送完成,"+reasonEntity);
        }

        return "ok";
    }
}
接收消息:
@RabbitListener(queues = {"hello-java-queue"})
@Service("orderItemService")
public class OrderItemServiceImpl extends ServiceImpl<OrderItemDao, OrderItemEntity> implements OrderItemService {

    @Override
    public PageUtils queryPage(Map<String, Object> params) {
        IPage<OrderItemEntity> page = this.page(
                new Query<OrderItemEntity>().getPage(params),
                new QueryWrapper<OrderItemEntity>()
        );

        return new PageUtils(page);
    }

    /**
     * queues: 声明需要监听的所有队列
     *
     * org.springframework.amqp.core.Message
     * 参数可以写一下类型
     * 1,Message message:原生消息详细信息。头+体
     * 2,T<发送消息的类型> OrderReturnReasonEntity content
     * 3,Channel channel:当前传输数据的通道
     *
     * Queue: 可以很多人都来监听。只要接收消息,队列删除消息,而且只能有一个收到此消息
     *   1),订单服务启动多个:同一个消息,只能有一个客户端收到
     *   2),只有一个消息完全处理完成,方法运行结束,我们就可以接收到下一个消息
     */
    @RabbitHandler
    public void receveMessage(Message message, OrderReturnReasonEntity content, Channel channel) throws InterruptedException {
        byte[] body = message.getBody();
        //消息头属性信息
        MessageProperties messageProperties = message.getMessageProperties();


        System.out.println("接收到消息内容;"+content);

    }

    @RabbitHandler
    public void receveMessage(OrderEntity content) throws InterruptedException {

        System.out.println("接收到消息内容;"+content);

    }

}
结果为:
消息发送完成,OrderReturnReasonEntity(id=1, name=hhhh-0, sort=null, status=null, createTime=Mon Jul 19 00:30:58 CST 2021)
消息发送完成,OrderReturnReasonEntity(id=1, name=hhhh-1, sort=null, status=null, createTime=Mon Jul 19 00:30:58 CST 2021)
消息发送完成,OrderReturnReasonEntity(id=1, name=hhhh-2, sort=null, status=null, createTime=Mon Jul 19 00:30:58 CST 2021)
消息发送完成,OrderReturnReasonEntity(id=1, name=hhhh-3, sort=null, status=null, createTime=Mon Jul 19 00:30:58 CST 2021)
消息发送完成,OrderReturnReasonEntity(id=1, name=hhhh-4, sort=null, status=null, createTime=Mon Jul 19 00:30:58 CST 2021)
消息发送完成,OrderReturnReasonEntity(id=1, name=hhhh-5, sort=null, status=null, createTime=Mon Jul 19 00:30:58 CST 2021)
消息发送完成,OrderReturnReasonEntity(id=1, name=hhhh-6, sort=null, status=null, createTime=Mon Jul 19 00:30:58 CST 2021)
消息发送完成,OrderReturnReasonEntity(id=1, name=hhhh-7, sort=null, status=null, createTime=Mon Jul 19 00:30:58 CST 2021)
消息发送完成,OrderReturnReasonEntity(id=1, name=hhhh-8, sort=null, status=null, createTime=Mon Jul 19 00:30:58 CST 2021)
消息发送完成,OrderReturnReasonEntity(id=1, name=hhhh-9, sort=null, status=null, createTime=Mon Jul 19 00:30:58 CST 2021)
接收到消息内容;OrderReturnReasonEntity(id=1, name=hhhh-0, sort=null, status=null, createTime=Mon Jul 19 00:30:58 CST 2021)
接收到消息内容;OrderReturnReasonEntity(id=1, name=hhhh-1, sort=null, status=null, createTime=Mon Jul 19 00:30:58 CST 2021)
接收到消息内容;OrderReturnReasonEntity(id=1, name=hhhh-2, sort=null, status=null, createTime=Mon Jul 19 00:30:58 CST 2021)
接收到消息内容;OrderReturnReasonEntity(id=1, name=hhhh-3, sort=null, status=null, createTime=Mon Jul 19 00:30:58 CST 2021)
接收到消息内容;OrderReturnReasonEntity(id=1, name=hhhh-4, sort=null, status=null, createTime=Mon Jul 19 00:30:58 CST 2021)
接收到消息内容;OrderReturnReasonEntity(id=1, name=hhhh-5, sort=null, status=null, createTime=Mon Jul 19 00:30:58 CST 2021)
接收到消息内容;OrderReturnReasonEntity(id=1, name=hhhh-6, sort=null, status=null, createTime=Mon Jul 19 00:30:58 CST 2021)
接收到消息内容;OrderReturnReasonEntity(id=1, name=hhhh-7, sort=null, status=null, createTime=Mon Jul 19 00:30:58 CST 2021)
接收到消息内容;OrderReturnReasonEntity(id=1, name=hhhh-8, sort=null, status=null, createTime=Mon Jul 19 00:30:58 CST 2021)
接收到消息内容;OrderReturnReasonEntity(id=1, name=hhhh-9, sort=null, status=null, createTime=Mon Jul 19 00:30:58 CST 2021)

